


Do you know how to slice a ham at home?
Discover the steps to slice your Cinco Jotas ham like an expert slicer and achieve the perfect slice.
Before you start slicing any of our 100% Iberian acorn hams Cinco Jotas, you must identify its parts:
- Maza. The marbled and juicy part, where it is recommended to start cutting the ham. This is where you will most enjoy the slicing process, as well as achieving the most aesthetic slices. It is also the easiest part to preserve.
- Babilla. The most cured area of the ham.
- Punta. The area with intense flavor.
- Jarrete or shank. The part closest to the hoof, known for its great flavor and sweet nuances.

Where do we start slicing the ham?
We must always keep in mind these three rules to make the most of our Cinco Jotas ham:
- Cut the piece maintaining straight lines.
- Surfaces should always be flat.
- Keep the different bones of the piece clean.
During the process, we will need three types of knives:
- A butcher"s knife, strong and wide to peel the ham.
- A wide knife with a fine and sharp point to separate the meat from the bones.
- A ham knife that should be long and flexible.
To open the ham, use the butcher"s knife to make an oblique cut three fingers below the shank, reaching the bone. In these first cuts, the ham should be placed with the hoof facing upwards. Then, remove the layer of fat that protects the ham during the curing process in the cellar. Always cut with the help of the ham holder, exposing only the part we wish to slice. The goal of these cuts is to reach the white fat and then profile the muscle. We recommend saving some pieces of fat to protect the ham from oxidation.
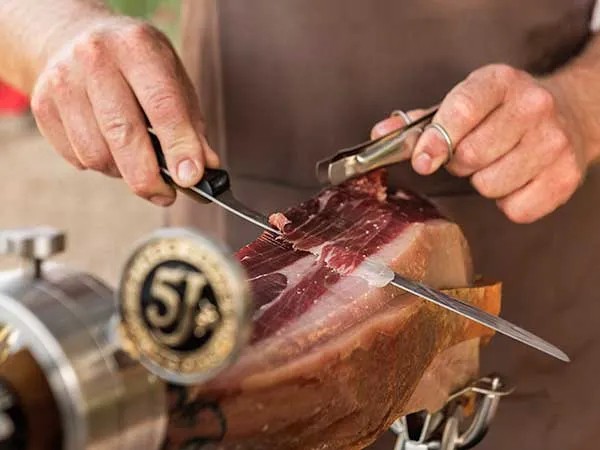
What is the slicing technique for a perfect slice? Thin, small, and melts in the mouth.
Place the part of the knife closest to the handle on the maza, keeping the blade flat, lightly press, and slide gently from left to right, cutting towards yourself. Use tongs to detach the slices from the acorn ham. The first slices from the shank are cut by sliding the knife upwards, keeping the straight line so that the piece is maximally utilized. Then, continue slicing from the shank to the maza. During the process, enjoy the marbling, color, and infiltrated fat that signifies the quality of Cinco Jotas.
Obstacles during the slicing process:
- The first obstacle we face when slicing the maza is the hip bone. Using the fine-point knife, separate the meat from the bone. Once this is done, you can begin slicing the first pieces from the punta by sliding the knife from one end to the other.
- The second difficulty will be the fibula bone. Keeping the rule of flat surfaces, make a small incision in front of the fibula, then continue slicing. Alternate between cutting a slice forwards and one backwards.
- The next bone to appear is the knee bone. As before, make a cut behind it, then alternate cutting slices forwards and backwards, creating two steps.
- The next bone will be the hip bone, where you will need to separate the bone from the meat to make it easier for the slice to detach. Begin slicing by sliding the knife from the handle to the tip, obtaining one of the most delicious slices of our Cinco Jotas ham. The perfect combination of lean and fat.
After reaching the bone, it’s time to turn the ham over to start slicing the babilla. You must remove the oxidized fat layers from the ham, as we did with the maza. This part of the ham is characterized by its strong flavor, firm texture, and long aftertaste. When the knee bone appears, the first slice will go upwards. Make a small cut behind the knee to ensure the slice detaches easily. When cutting the slices around the hip bone, with the bone to the right, you will need to cut with the back of the knife, sliding from the base of the handle to the tip.
![]()
Final slices of a 100% Iberian acorn ham:
Once the hip and knee bones are exposed, continue slicing until you reach the femur – indicating that the slicing of the babilla is complete. Place the ham Cinco Jotas on its side on the ham holder and proceed with the third cut. Depending on the angle applied to the knife, the slice will be more or less elongated. Continue the cut diagonally through the hip, femur, and knee.
The last step is to remove the fibula bone to obtain the remaining meat from the shank. For the meat near the femur, we recommend making small cubes for stews and croquettes. Ready to become a true master slicer?
